UK Beauty, Fashion & Lifestyle

Tuesday, 31 March 2015

Nothing A Hot Bath Won't Cure

instagram: naomi_alice
Okay so there are some things a hot bath won't cure, obviously...but a bath is a darn good remedy for a lot of things. A place to relax; to read; to sing; to cleanse. Here's an ode to one of the oldest past times of our world and some of my bath time favourites.
A lil whisky lemonade never hurt nobody. Tea is almost as good. There's something about bubbles and alcohol (or alcohol with bubbles) that makes for perfect relaxation. 

I love reading in the bath. Magazines are good but they tend to get soggy and all the advertisements fall out so you're swimming in perfume ads and scratchcards. Take a book. Or a kindle. Just try not to drop it.
The steam opens up our pores and gets blood flowing to our face: baths are good for our skin. I like to use a face mask or just give my skin a really good cleanse. I'm currently loving La Roche-Posay Effaclar range. Review coming soon.

Candles just look so much more beautiful next to water. I picked some up from Primark the other day (the pink one in the pictures is a Watermelon one) and they're surprisingly lovely. 

Bubbles, bubbles and more bubbles. I hate most bath bombs. Instead, good old Radox Lavender is my absolute fave.
Bath Time Faves


Baths are the best relaxation. It's like a half-nap in water that smells good. Baths forever, eh. 
SHARE:

Monday, 30 March 2015

#MOTD Makeover Monday

Back home for Easter means the opportunity to get my ridiculously photogenic sister to let me play dress up. I went for a shadow wing and a pop of pink lip. The flawless skin is thanks to some colour correcting and werkin with some decent brushes. Have a read of the posts for more info.

I love this shadow look. It's dramatic but so simple to do. Extend your shadow with a small applicator brush and let your liner meet it. I also love a bold dark eye with a pink lip: it's kinda girly but with an edge.

More pictures and full product listing below.


Foundation: Rimmel Lasting Finish Nude Ivory 
Corrector: Laroc Palette
Concealer: Phwoarr Paint
Bronzer & Contour: Benefit Hoola
Blusher: Revlon Wine Not
Highlighter: Revolution Baked Peach Lights
Shadows: Urban Decay/Sin
Lipstick: Rimmel Pink Blush
SHARE:

Saturday, 28 March 2015

Ciate Caviar Manicure

Hi lovelies! I've had this sat in my room at home for over a year and finally decided to put it to the test. These are Ciate minis: the polish is in Pillow Fight and the caviar is Sweet Dreams. This particular caviar is not available online but there are so many colours to choose from.

Let's get started!

The polish itself is the most beautiful colour: a soft grey with a hint of lilac. It applies well and dries pretty quickly. All round thumbs up.
The caviar. Gosh, I had to do some googling to figure out the best way to apply this. In the end I settled with the 'just pour' method. Using a little clear tray to catch the excess beads (you could use anything container-like to be honest), I poured the beads onto my nail that was fresh with a thick clear coat.
I really love the result. These beads are obviously not going to last more than a few days but this is such a great look. I want more! Let me know what you think of these/if you've tried them.
SHARE:

Tuesday, 24 March 2015

#MOTD Orange Smoky Eye Look

Today's look is a sort of orange/brown 'greasy' smoky eye, trying not to keep things too neat. I'm really loving doing #MOTD posts for you so imma keep em coming. 

You can achieve this look even without 'paint' style shadows. My trick is to apply the tiniest amount of argan oil to your application brush. It shouldn't feel wet, just slightly 'greasy'. Sounds a bit gross but works a treat!
The above is everything I used on my eyes, including just the fourth down matte brown shade and the first down base shade in the Revolution Iconic 2.

I combined this with some big brows, a nude-orange lip, lots of bronzer and some seriously wild hair (I'm at a loss with my hair at the minute and just letting it do its crazy thing.) Keep reading for more pictures and full product listing.


Foundation: Rimmel Lasting Finish in Ivory
Concealer: Maybelline Dream Touch Lumi in Ivory
Bronzer & Contour: Benefit Hoola
Highlighter: Benefit High Beam
Liquid Liner: Collection Fast Stroke
Kohl Liner: Avon 
Shadows: MAC Mythology (Orange Shimmer)
Revolution Iconic 2 Palette (Matte Brown, Black and Base Colour)
SHARE:

Monday, 23 March 2015

My Favourite Nude Lipsticks

Today's post is a look at my favourite nude lipstick picks, ranging from £2 to around £20. They're all different toned nudes: some are slightly pink, whilst others are more beige. They're all cream finish as matte nudes look terrible on me (my lips are never quite in good enough condition for them, especially coming out of winter.)
Going from the darkest to lightest shade:
Colour Surge lipstick by Clinique. A very pink toned nude, definitely brilliant for anyone looking for the perfect 'Kylie Jenner' colour. Sadly it's not stocked in-store any more, but many of their lipsticks are a similar colour and you can often see this sold on Amazon. Find it here.
Long Last lipstick from Clinique. This is such a beautiful lipstick, I can't recommend it enough. It's the perfect standard nude with a creamy but long lasting finish. Find it here.
Colour Drench lipstick by 2True. Super affordable orange-toned nude with a great finish. Find it here.
Lastly, Lip Paint lipstick by Barry M. The nudest of nudes I own/have discovered! It's slightly pink toned and looks best if your lips are in great condition, but all together a great lipstick for a great price. Find it here.

Let me know which is your favourite and if you have any favourite nude lipsticks to recommend!
SHARE:

Wednesday, 18 March 2015

The diet that has nothing to do with food & the danger of denial

My article for Her Campus this week is all about a new diet that has nothing to do with food but everything to do with the way we wear makeup. I talk you through the benefits of the new 5:2 proposal for our faces.
source
However, it's so much bigger than that. With weekly crazes, the way we're 'told' to live our lives is becoming increasingly more dictatorial. It's meant to help us, yes...but why not help ourselves in our own way?

"It's an age old debate. Why diet when you could just eat healthily? Why structure our lives when we could just, in a wild act of self-assertion, decide whether or not we want to wear makeup that day? We’re split into the categories of ‘women who care too much’ and ‘women who care too little.’ We’re told that goodness comes through restriction and order. Don’t eat that; don’t wear that much makeup (even though we’re ‘expected’ to at least wear some); don’t allow yourself to look like you’re trying."
Read the full article here.
SHARE:

Tuesday, 17 March 2015

Drugstore Lipstick Haul: All Under £5

I resisted MAC this weekend (though I'm currently lusting after Shy Girl and Blankety, aghh!) and turned my heels to Superdrug instead. I picked up four lipsticks, each under £5. See what I thought of them below!
Rimmel Lasting Finish/Starry Eyed 
(See my post for a full look with this.) A gorgeous plum/purple shade with a creamy texture. It also smells of plums/wine? (or maybe that's the colour seeping into my imagination...) I usually shy away from purple but I'm so glad I picked this up as I think it suits my pale skin and green eyes (purple is the colour for you if you're the same combination!) Find it here.

2True Colour Drench/No 6
I hate it when products don't have names (that's all the fun of branding, surely?) but this is 'Shade 6': an orange-toned nude. It's creamy but buildable and also smells really nice.
No6
MUA/Tulip
This is my attempt at finding an affordable pretty pink for Spring. I love MUA lipsticks as you may know, so I love the formula for this. The pink can look a bit 'Barbie' with heavy makeup, but keep your look light and it's a lovely pop of colour. Find it here.
Tulip
MUA/Bare
A really nice cool toned nude, but not the best I've ever tried. It needs a good translucent powder over it to set. Find it here.
Bare
Til next time x
SHARE:

Monday, 16 March 2015

My Current Hair Care Routine: I'm growing my hair, again

I seem to spend years growing my hair before going back and cutting it all off in an impromptu salon trip. I get heavy bangs put in and within three months I'm super bored with it and wish I had long flowing princess hair. So I decided enough was enough. This is what I'm taking care of my hair with and my tips for those of you trying to get that growth!
Growing out bangs
The most gross task in first world existence? Bangs looks stupid when being grown out, there's no denying. Here's what I'm doing currently:
  • Get them trimmed to make sure they're light. This is especially important if you've been rocking a full fringe, as they'll probably be the thickest part of your hair. I trim mine myself usually and I thin them myself too (I hate the hairdresser's...shudder)
  • So you have three options here: sweep em to the side, clip them in a quiff or straighten em down. When I've grown out bangs before I always used to go quiffy, but seeing as my forehead seems to be consuming the universe that's simply not an option.
  • Instead, I side part mine, straighten them, pin them down and set them in place with hairspray in an attempt to be a poor man's Kim K. I use clip-in extensions to give my ponytail a bit more volume.
Growing out length 
Trim it and leave it is probably the best advice, but that's not realistic. The best things I've found are:
  • Wash your hair less. Try every three days if you can (I used to wince at that too, but I can make it work nowadays.) Shampooing strips hair of oils that promote a healthy scalp, essential for healthy hair. If you can't handle the grease, simply rinse your hair with water whilst showering. Massage your scalp and it'll be like invisible shampoo and your mind will be tricked. Maybe. 
  • Trim the splits. DIY. You don't need a salon for that. 
  • Avoid heat. Meh. I love heat styling because my hair is so insane, but with my slicked hair it means I only have to straighten the bangs themselves. I also leave my hair to dry naturally.
  • The lengths I leave curly and use clip-in extensions to bulk out the madness. Simple.
Products and Potions I'm loving
Shampoo: Elvive Extraordinary Oils.  This line by L'Oreal is so good. The serum itself is the most perfect thing for taming dry flyaway hair. The shampoo is a kind of watered down formula, essentially (it contains the same six flower oils.) I love the way this smells and it leaves your hair feeling soft and nourished.
Conditioner: Garnier Ultimate Blends Conditioner. The avocado and shea butter in this leave my hair so soft. Can't really vouch for how well this 'repairs' but it smells good and feels great.
Hairspray: Pantene Pro-V. The choice of the runway, this is my fave hairspray. Brushes out gently and smells divine.
Dry Shampoo: Batiste Cherry, errrrytime. Have the confidence to skip washing your hair with this dry shampoo. Tie it up and leave it be. Be brave, friends. 
Heat protection: L'Oreal Studio Line Hot & Sleek. Read my review here 
Supplements: Perfectil Skin, Hair and Nails. Hurry hurry, these have money off in all UK drugstores at the mo! I don't really see a difference in my skin, but my hair and nails are noticeably longer and stronger.
What are your tips for growing out your hair? I would love to know!
SHARE:

Saturday, 14 March 2015

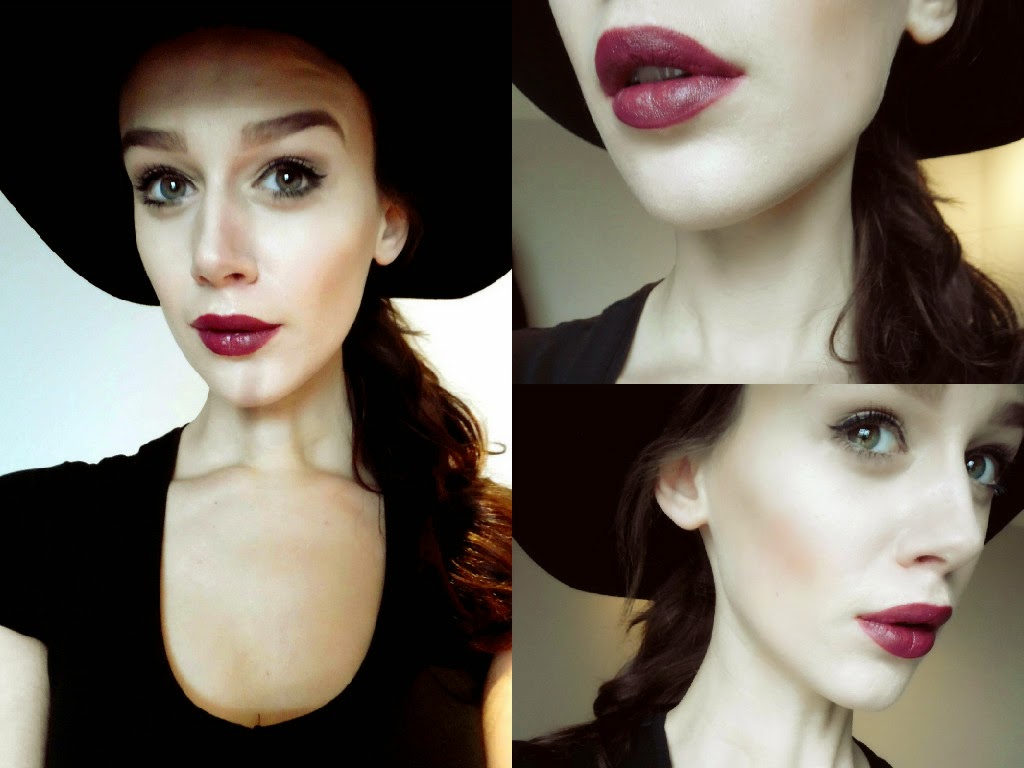
Vamp Lips #MOTD

I will be back to reviewing very soon (promise!) but I had to show you this beautiful lipstick. I combined it with a soft beige eye, bold brows and a massive hat (these hats are a bit basic now, I know, but I still love em.) Product list below!
Concealer: Phwoarr Paint (read my review here)
Bronzer & Contour: Benefit Hoola
Shadow: Two shades from the Revolution Iconic Palette (read my review here
Mascara: Benefit Roller Lash (read my review here)
Brows: MUA Pro Brow Kit (read my review here)
(I didn't use any powder today...my skin is behaving so well thanks to Herbalism!)
Last but not least, Lipstick: Rimmel, Starry Eyed 
Stuff I haven't reviewed will be reviewed soon! Til next time x
SHARE:

Thursday, 12 March 2015

How to Highlight

Highlighter is my favourite. Drawing attention to the high points of your face enhances your cheekbones and adds a gorgeous glow that takes your makeup to the next level. I prefer liquid highlighters so today I've used one drugstore one and one high(er) end formula: the 2True 3-in-1 Concealer&Highlighter combined with Benefit's High Beam. The first will set you back £2 and the second will set you back £20. Be my guest in judging!

I don't usually combine the two (they each work well but differently alone) but here I'm beginning with the drugstore one then enhancing with Benefit. I've already applied foundation and contoured my cheeks, as that's the usual order I follow, finishing with highlighter.
2True Concealer&Highlighter
I apply this to the high point of my cheekbones. If you wanted to contour properly, then apply this in a triangle (bringing it up under your eyes.)
XCSource domed kabuki
I then blend this in with my XCSource domed kabuki. Domed brushes are perfect for work around the eye and cheekbone area. For my skin, I find stippling this product creates a smoother finish. Your fingers will work well for this task if you don't have a domed brush.
Benefit High Beam
You can see that beneath the second highlighter that there's already a nice effect. Nevertheless, I love High Beam. It's a pearly pink miracle in a bottle and I reckon is surprisingly versatile for a range of skin types (it's almost sheer.) I dot this along the high points of my cheekbones, onto my brow bone and on my cupid's bow before blending it out.

Tip 1: If you have large pores around your nose/under your eyes, keep your highlight at the highest points of your cheekbones. A highlight can look super radiant on some people's cheeks (those with flawless skin!), but if you have large pores that you don't want to draw attention to then keep it high.

Tip 2: The areas to highlight are the cheekbones, brow bone and cupid's bow. The latter two bring out your features tenfold (eyes will appear larger, lips will appear fuller.)

And that's it! Highlighting is so easy. Let me know if you like this and what products you use to highlight.
SHARE:
© Getting to Nomi

This site uses cookies from Google to deliver its services - Click here for information.

Blogger Template Created by pipdig